

Talk given by Linda Sparks, Farthingales, August 19, 2001
NOTE: This was written before Linda invented the Bone Tipping Dies that can be used with Vario Pliers or a Hand Press tool.
Along with the increase in demand for steel and costume building supplies, there has been an increase in questions and curiosity about what steel can be used for and how best to work with it. This has led me to develop a short program to educate people about steel use in costuming. The information could easily be applied to the building of props as well.
I‚ would like to begin with the different types of steel. All of the steel stocked by Farthingales is designed for use in clothing but many people are familiar with using steel designed for other purposes such as packing. Regardless of where you get your steel you should be aware of the characteristic each offers and the characteristics you require for your project. No steel is suitable for all of your costume steel needs.
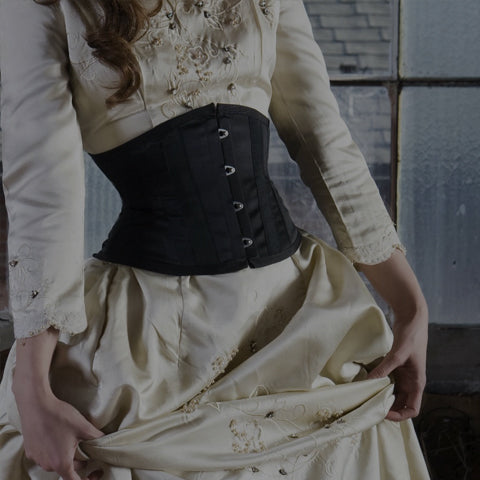
Hoop Steel & Boning
Packing steel is easily found, cheap and of reasonable strength for some projects. However it is inclined to rust, and tends to have sharp edges that can cut the casings as well as your hands. It is suitable for corsets and bustles but not for hoop skirts due to it’s tendency to bend and to rust.
Plastic Coated Hoop Steel is designed for costume and garment use. The core is solid steel and the shell is white nylon paint, making it rust proof and clean to work with. The paint coating also dulls the edges making it a "user friendly" steel product -- no chance of cutting your hands or the casing. These steels come in several sizes and it is important to remember that the thickness is more important than the width when determining which product is appropriate for your project.
Thread Covered Steel has a woven thread covering that unravels easily. The inner core is raw steel so there is a higher tendency for this product to rust. The advantage of this steel is the fact than it can be stitched allowing it to be attached to itself or to fabric. There are three widths available and all are the same thickness of steel, all sizes come in both black and in white. Not easily bent out of shape these are all suitable for either hoops or bustles but the thread covering makes this product unsuitable for corset building as it will not slide into casings easily. It can be used for cage crinolines as the wires can be stitched to the vertical tapes. The narrowest one is traditionally used for tutus.
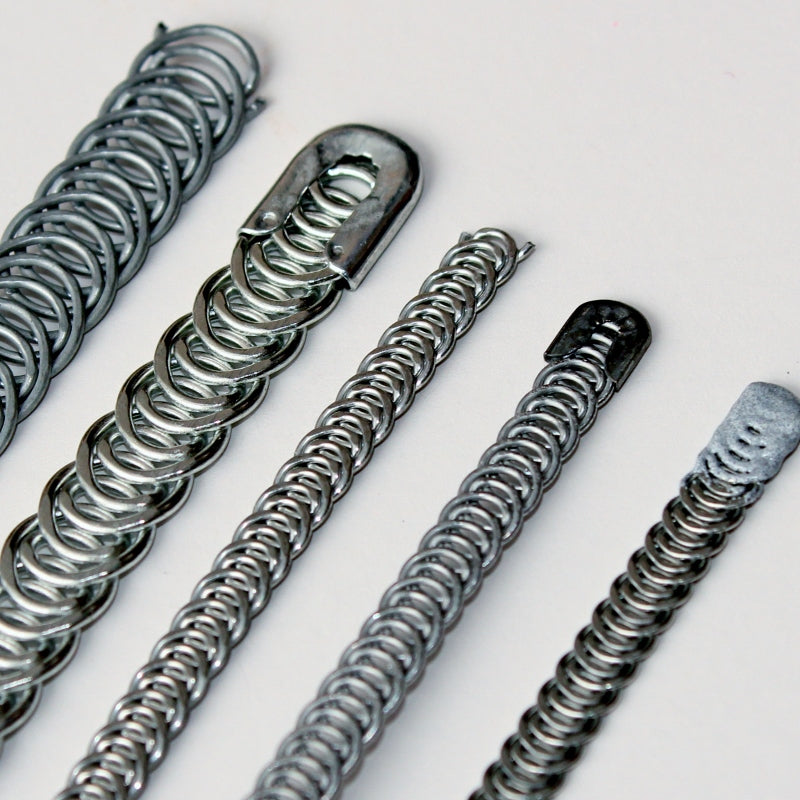
Spiral Steel looks to be raw, unfinished steel wire that has been coiled and flattened. In fact it does have a factory applied finished and is not inclined to rust. Despite the finish that is applied, handling it will leave gray marks on your hands. It is made in three widths and thickness (only two are stocked by Farthingales at this time). Because it is a coil it can be sewn if necessary, though this is not usual. It is appropriate for corsets and for the top row of farthingales and hoop petticoats. Spiral steel has the advantage of flexing in any direction, front to back or side to side so it takes curves while still adding support to the garment.
Spring steels are typically white in colour as the steel has been coated with a rust resistant nylon paint. Spring steels vary in thickness and in widths. The thickness is more important than the width if you are concerned about strength and you should not be able to easily bend them, flex yes, but not bend to the point of putting a kink in them. These steels flex only from front to back and not side to side. They are best used in earlier corsets and "bodies" and for the centre back of all corsets.
Other than steel there is also plastic boning, these are most useful in lightly boned corsets or bodices and in millinery.
Plastic Whalebone is in theory a replica of the authentic whalebone but it is a "distant second". The whalebone that I have seen was very fine, very flexible and almost weightless. The plastic whalebone in contrast is dense, thick and much heavier, although still lighter than steel. It can be cut with scissors but it cannot be sewn through. It is available in two widths, 7mm(14") and 10mm(38"). It is an alternative to springsteel, though not nearly as supportive and is best used in straight lines as it cannot curve the way spiral bones or the original whalebone did.
German Plastic Boning is available in 4 widths, 5mm(3/16"), 7mm(1/4"), 11mm(7/16") and 13mm(1/2"). It is important to note that all plastic boneing eventually tends to take on the shape of the person’s body that is wearing the garment, so while plastic bones create comfortable light weight garments they do not force the body into a desired shape indefinitely. They are also not strong enough to support larger women. Plastic bones serve their best purpose as an easy way for beginners to learn about boneing corsets or in bodices where undergarments will be worn.
Corsets made with any of the above products could be hand washed, but never put in a washing machine as the agitator will bend the bones and once bent, they cannot easily be straightened. It is best to have boned garments dry-cleaned. To the dry cleaning required always wear a chemise or cotton tube between the corset and skin.
While I have mentioned what these items are all best used for that does not mean they would not be a perfect solution for other projects you may have. By understanding the characteristics of each you will better understand how these products can be utilized in your work.
Hoop Steel and Boning Findings
There are various items that have been designed for use with either hoop steel or bones. Following is a list of these items with descriptions and use. You will find a chart on page 7 indicating which findings work with which hoop steel or bone product.
"U" tips are the most common item used with boning. Traditionally made of steel and applied in a factory using a machine exerting 1,000’s of pounds pressure these little tips are made in the shape of a "U". To apply these steel tips by hand is a challenge due to the strength required and the fact that pressure needs to be applied from all directions simultaneously in order for the tips to grip the bone well enough to stay on. Staying on is critical. The "U" tips are important as they blunt the ends of the steel and inhibit the steel creating holes in the fabric when the rough ends rub against the fabric during wear.. If the tips come off once the bone is encased not only will the fabric be exposed to the raw edges of the bone, so will the actors body! The tip may float around within the casing but this is rarely a problem or a discomfort. One wearing can see holes develop in the fabric if steels are not tipped.
Today these tips are available in different sizes and of great importance to us is that they can be made of aluminium. When buying tips to be applied by hand it is important to look for two things A) made of aluminium and B) the tips should have crimping in the base of the "U". Aluminium is very soft and pliable in comparison to steel and this makes setting the tips easier and more time effective. The crimping in the base of the "U" helps the tips set with a neater and less rough finish. Crimped aluminium tips can look factory produced and have the same durability even when set by hand.
Plastic Bone Ends (tips) are a fairly new product and come in one size only. Unlike "U" tips they add length to the steel piece, about ¾". An advantage to these tips is that they can be sewn through and this allows steel to be attached to fabrics. They can also be trimmed to lessen the length yet still blunt the end.
Application is simple; slide it on to the cut end of your steel. That’s it. If you wish a permanent attachment you will need to add a drop of glue for metal and plastic onto the end of the steel before sliding it into the tip.
Hoop Steel Connectors are a product developed by Farthingales two years ago, these are designed to make attaching steel ends to create a hoop simple. Traditional methods in theatre consisted of overlapping the ends and wrapping the joint with medical tape or drilling holes in each end and either riveting or tying the ends together. All of these methods presented problems. The hoop connectors are easy to use, require no tools and can easily be removed with a bit of effort. They are made of rust resistant steel and come in two sizes.
One draw back is that they are not universal, they were designed to each fit one steel product and were engineered carefully to fit snug without squeezing yet come off with little effort. The advantages are ease of use, ease of removal for cleaning, storing or transporting and lack of rust stain production even in out door environments such as heritage/historic villages.
Bone Casing Tape looks like a ribbon but is in fact a flat woven tube. It is designed to hold bones within a corset and its tight weave inhibits bones from forcing holes in the corset fabric at either end. Bone casing is available in either 100% cotton or viscose, the cotton has a matte finish and the viscose tends to be a bit shiny. Various widths are available and most of the boning products we sell can be used with a casing for either corseting or hoop skirt and bustle making. Both casings are dyeable.
The most commonly asked questions I get are "How do I cut the steel?" and "How do I finish the ends/ attach the steel together?" There are a few ways to finish and attach the steel depending on which steel you are using.
Cutting the steel is not difficult provide you have the right tools.
Tools
There are only a few tools needed for cutting and finishing steel for costuming. As in any job having the right tools makes the job a lot easier so they can be worth the investment, chances are you will have most of these around the house.
| Tool Name | Description | Average Cost $CAD |
|---|---|---|
|
Mini Bolt Cutters |
8" |
$15.99 |
|
Tin Snips |
compound action -- straight |
$17.99 |
|
File |
6" |
$ 5.99 |
|
Pliers |
"long nose" 6" |
$ 9.99 |
|
Pliers -- regular |
"slip joint" 6" shallow teeth |
$ 9.99 |
|
Tipping paint |
"Mr. Touch-Up"(plumbing dept.) |
$ 4.39 |
|
Scissors |
not your fabric Shears! |
|
PRODUCT LIST - Descriptions
| Hoop Steel | |
|---|---|
|
50-8414-02 |
fine plastic coated wire 2.5mm (1/8") wide X 1.4mm thick |
|
91-8403-13 |
light steel bustle steel 13mm (1/2") wide X .3mm thick |
|
50-8405-10 |
light hoop steel 10mm (7/16") wide X .5mm thick |
|
50-8406-06 |
corset weight steel 6mm (1/4") wide X .6mm thick |
|
50-8406-14 |
heavy hoop steel 14mm (9/16") wide X .6mm thick- |
|
50-8001-96 |
spiral steel 7/16"(10mm) top hoops or corsets |
|
55-8504-01 |
tutu steel 4.75mm (3/16") wide thread covered |
|
55-8509-01 |
hoop steel 9.5mm (7/16") wide thread covered |
|
55-8516-01 |
hoop steel 16mm (5/8") wide thread covered |
| Bones | |
|
47-8000-96 |
spiral bones ¼" (6mm) by the metre, also in pre finished lengths |
|
50-8001-96 |
spiral bones 7/16" (10mm) by the metre. |
|
50-8406-06 |
corset weight same as 50-8206- pre finished bones 6mm (1/4") |
|
50-5308- |
corset bones in pre finished lengths only 8mm (5/16") |
|
50-8125- |
plastic bones by the metre, 4 different widths available. |
|
91-8140- |
plastic whale bones by the metre, 2 widths available. |
| Hoop steel and bone findings | |
|
91-8015-06 |
"U" tips as used with spiral bones 6mm (1/4") |
|
91-8016-11 |
"U" tips as used with spiral bones 11mm (7/16") |
|
91-840E-11 |
Plastic ends/tips for steel 11mm (7/16") |
|
91-840E-14 |
Plastic ends/tips for steel 14mm (9/16") |
|
00-8400-11 |
Steel connectors for hoops 11mm (7/16") |
|
00-8400-14 |
Steel connectors for hoops 14mm (9/16") |
| Bone Casing | |
|
34-7212-01/90 |
bone casing 13mm (¬Ω") |
|
34-7234-01/90 |
bone casing 19mm (3/4") |
|
91-7258-01 |
bone casing 17mm (5/8") |
|
91-7278-01 |
bone casing 22mm (7/8") |
Bone Casing and Bone/Hoop Steel Chart
| Casing # | Width | Bones -- that fit | Hoop Steel -- that fits |
|---|---|---|---|
|
34-7212-01/20/90 |
13mm (1/2") |
50-8206- |
50-8406-06 |
|
34-7234-01/20/90 |
19mm (3/4") |
50-8313- |
50-8405-10 |
|
91-7258-01 NO LONGER AVAIL. |
16mm (5/8") |
50-8206- |
50-8406-06 |
|
91-7278-01 NO LONGER AVAIL. |
23mm (7/8") |
50-8125-11 |
91-8403-13 |
Tips and Connectors Chart
|
|
91-8015-06 6mm "U" tips |
91-8016-11 11mm "U" tips |
91-840E-11 11mm plastic ends |
00-8400-11 11 mm connectors |
00-8400-14 14mm connectors |
|---|---|---|---|---|---|
|
50-8414-02 |
|||||
|
|
|||||
|
50-8405-10 |
X |
X |
X |
||
|
50-8406-06 |
X |
||||
|
50-8406-14 |
X |
||||
|
55-8504-01 |
X |
||||
|
55-8509-01 |
X |
X |
X |
||
|
55-8516-01 |
|||||
|
47-8000-96 |
X |
||||
|
28-8001-96 |
X |
X |
X |
||
|
50-8206- |
X |
||||
|
50-8308- 50-8511- 11mm bones |
X |
X |
X |
|
|
|
50-8125-07 |
|||||
|
50-8125-11 |
X |
||||
|
50-8140-07 |
X |
X |
|||
|
50-8140-10 |
X |
X |
Cutting and Finishing Hoop Steel
Products
|
50-8406-14 |
plastic coated 14mm (5/8") wide |
|
50-8405-10 |
plastic coated 10mm (3/8") wide |
|
|
|
|
55-8504-01 |
thread covered 4.75mm (3/16") |
|
55-8509-01 |
thread covered 9.5mm (3/8") |
|
55-8516-01 |
thread covered 16mm (5/8") |
To cut any of these you will need TIN SNIPS.
The first three products are plastic coated steel and can be cut simply if not easily. The thicker the steel the harder it is to cut. To make the job easier I give myself extra leverage by working on a table.
Steps to cutting plastic coated and raw solid metal hoop steel.
Be sure all your steels are marked for cutting.
- Open the tin snips and be sure the "catch" or lock is out of the way.
- Grasp the handle of the tin snips and rest the lower jaw against the table top, your hand will be out from the table, not over it.
- Place the steel between the jaws with the cut mark lined up with the jaw edge.
- Squeeze the jaws shut, keeping the lower jaw against the table.
Steps to finishing plastic coated and raw metal hoop steel ends.
- Clip the corners off the steel using the same technique as above.
- File the rough or pointed spots off using a small file.
- Place the file flat on the table.
- Hold the file still with one hand and drag the rough spot of the steel across it.
Always drag in one direction only and that should be toward your self. Never push the steel away from you as it will risk breaking off the plastic coating.
- Paint the tip with "Mr. Touch-up", allow to dry and apply a second coat if needed.
Be sure the paint is dry and hard before inserting the steel into a casing.
OR - Apply "U" tips as discussed in the "Tips" section.
OR - Place the "Plastic Ends" on to the ends as discussed in the "Tips" section.
IF
You plan on connecting two ends of steel to make a hoop then you need not bother with any of the above though it may be safer in the long run to clip the corners and file them down. You can simply slide the ends into the appropriate sized hoop connector.
Steps to cutting thread covered hoop steel.
Be sure all steel is marked for cutting.
- Using clear tape (Scotch Brand Magic Tape is best), tape over the cut mark so that tape is evenly on either side of it. Just one around is fine as this is just to keep the threads from unravelling.
- Cut as direct for the plastic hoop steel above. Be sure to have a pair of scissors handy as the tin snips rarely manage to cut through all the threads.
Steps to finishing thread covered hoop steel.
- Remove the tape carefully. The tape should not be left on the steel unless the steel is going back to be stored for later use. Leaving tape on effects the tipping process and it has a very short life as it is not durable.
- Apply a small drop of white glue to the threads and be sure they are pressed together well. This secures the threads and will be beneficial when tipping.
- When the glue is dry apply "U" tips or plastic tips as described in the "Tips" section. You may need to clip the corners to do this and this should not be too difficult with the threads glued in place.
Steps to Cutting and Finishing Bones
Products
|
47-8000-96 |
spiral steel bones 7mm (1/4") wide |
|
50-8001-96 |
Spiral steel bones 11mm (7/16") wide |
|
50-8125-05,07,11,13 |
German plastic bones all sizes |
|
50-8406-06 |
6mm (1/4") wide, by the metre |
|
50-8206-all lengths |
exactly the same as item 8406 above. |
|
50-8308-all lengths |
8mm (5/16") wide |
|
91-8140-07,10 |
Plastic whale bone |
All steels listed above should be cut with BOLT CUTTERS, all plastics can be cut with tin snips or even scissors (not fabric shears, just any old paper scissors will do).
Steps to cutting spiral bones -- any size.
Mark the cutting line.
- Using bolt cutters. Align the cutting mark on the outside wire of the spiral bone with the tip of the bolt cutter jaws. Snip the outer wire only.
- Flip the bone over and do the same on the other side.
- The bone should come apart in two pieces.
IF - It does not then -- - Bend the bone at the crease created by the cutting attempt and the bone will break at these points. You may have to snip it again.
DO NOT try to cut through the whole bone as it results in a messy cut and can be more difficult to tip. - The cut wires should not be protruding, clip the raw end again to shorten or file using the small file.
- Place the file flat on the table.
- Hold the file still with one hand and drag the wire across it, toward you, repeat until the wire is not protruding beyond the width of the bone.
Steps to finishing spiral bones -- Application of Tips
"U" tips were designed for spiral bones and they are the best way to finish the ends.
Attaching the "U" tips is a bit complicated and takes some practice. Have all your bones cut to size and within reach, have the tips within easy reach also. Place one pair of needle nose pliers in your right hand, place one tip, flat, between the jaws. Gently apply pressure so that you are gripping the tip but not squishing it. Pick up a bone, slide the cut end into the tip, squeeze the pliers a bit to grip the tip and the bone. Now pick up the second set of pliers in your left hand, apply the jaws to either side of the tip. Apply pressure to both sets of pliers simultaneously. If you apply pressure in only one direction the tip pops out in the opposite direction. Some people say they resort to glue to help, if you do this use the glue sparingly
Steps to cutting spring steel bones
Mark the cutting lines.
- Align the cut mark on the steel between the jaws of the bolt cutter; squeeze.
- Rest your thumb and forefinger on the steel, either side of the bolt cutters.
- Press down quickly to snap the steel. If you press slowly you will end with a slight bend at the tip that will create a problem for tipping and for sliding into any casing.
It’s very difficult to trim a small amount off this steel so practice this technique on scrap for a bit as it does take awhile to get it right.
IF
The steel is wider then 8mm(3/8") you may need to use tin snips, bolt cutters work best on narrower steel.
Steps to finishing spring steel bones.
- File the sharp corners down slightly.
- Apply "U" tips OR
- File corners down.
- Paint with "Mr. Touch-Up"
- Let dry and reapply in needed.
Steps to cutting plastic bones.
Mark cutting lines.
- Use scissors and cut directly across the bone.
- Shape the cut ends using the scissors. The ends can be rounded or slanted, your choice.
- Any rough spots can be filed off with an emery board or nail file.
No tipping or finishing is required, however "U" tips can be used if sizes are appropriate.
Application of hoop steel connectors is simple.
- Cut your steel to the required length less about 19mm( ¾").
- Be sure the plastic coating is in tact and not likely to catch on the connector when sliding it on. Use a drop of glue for plastic and steel if needed to adhere the coating to the steel.
- Slide one end of the steel into the hoop connector as far as you can, you may have to push to get it snug.
IF
The steel does not appear to fit due to being to thick, use a flat screwdriver to pry up the flaps slightly to allow the steel to slide in. If you pry it up too far then simple use pliers to press the flaps back into place. - Feed the steel into the casing leading with the hoop connector. The ends of the hoop connector are rounded to facilitate this process and minimise the risk of catching the hoop steel on the casing.
- When the hoop steel is in place slide the connector onto the back end of the hoop steel.
What products are used for what projects?
There is often confusion as to what product is best for the project at hand. Now that you have a better understanding of the product characteristics you can likely determine for yourself what products you need.
There are a few basic rules.
When working on hoops -- for skirts or for mascot animals, answer these questions.
- How large is the circumference of the hoop?
- How heavy is the fabrics the hoop will have to support?
- What is the volume of the garment, is it heavily gathered?
- How many hoops are being used?
- How durable does the costume need to be?
- Is it a long run?
- How much action will the garment have to endure?
- What construction techniques do you plan on using?
Depending on your answers you may want to use 50-8406-14 the heaviest plastic coated steel. It makes the most durable hoop and is least likely to collapse with the weight of upholstery fabric, it has great "spring" ability and is not inclined to get bent with rough wear. It can be used with hoop connectors for quick finishing and you will likely require less hoops which may mean less labor cost. Hoops made of this will last for years.
If lasting forever is not an issue, then consider 50-8405-10, a steel that is only slightly thinner and not quite as wide, this product also fits hoop connectors for a quick neat finish. More hoops will be required for heavy fabric support but it is perfectly adequate for lighter cotton and taffetas. The weight of the garment will also be lighter and it may be more manageable for the actress, if she is required to sit down. No matter what product is used it’s important to allow rehearsal time for the person involved to learn to move when wearing these types of garments.
Depending on your construction technique the thread covered steel may be your best choice. #55-8516-01 or 55-8509-01 both offer strong spring type steel but with a thread covering that allows you to stitch to the steel, important in cage style crinolines. These products are available in black and in white. 55-8509-01 fits the hoop connectors #00-8400-11 with a little help (pry up the flaps slightly)
For Bustles and Panniers
Ask similar questions as for hoops.
The best product for these has strength but the ability to flex into smaller curves without putting excessive stress on the fabric at the ends. This requirement rules out item #50-8406-14, as this product has a strong "spring" ability and pressure on the fabric at the ends will be extreme and likely cause the garment to have a very short life.
Product 50-8405-10 would work well as would product #91-8403-13. The former was mentioned above for hoops and the latter is a very flexible steel that will put little strain on the fabric yet it will support most small bustles and panniers -- depending on how large and the weight of the exterior fabric. Large panniers will require #50-8405-10 or the thread covered #55-8509-01. How you build your bustle or pannier is also important.
For Corsets and Boned Bodices
The choice of steel is dependent on both the time period and to some extent the body to be corseted.
Less flexible spring steels such as 50-8206- can be used in earlier period corsets where smooth strait lines were required and for the straight over the bust channels in later curvy corsets where the wearer has large breasts needing support. These steels should always be used in the center back of any corset or bodice with back lacing.
Standard boning for corsets is the 6mm (1/4") spiral bones #47-8000-96. These are excellent for theatrical use as they create the shape required, support the garment but allow the actress great freedom of movement. This is of particular importance if she has a physically active role or has never been corseted before. Spiral bones of this size will not be enough to support an actress who wears a "D" cup or more, it would be worth using the larger spirals (#50-8001-96) or the above mentioned spring steel in the channels supporting the breasts. The spiral steels are the only boning that will give flawless results in the latter period corsets with their many and varied curves as these steels can move in any direction.
Plastic boning is best used for light support in bodices or in corsets for small breasted women where support of the body is not an issue, just support of the garment. It can be used alternately with steel to produce a lighter weight corset. It is important to note that any plastic boning will, with the application of heat -- even body heat -- change shape. This means that after a couple of wearings the garment will begin to conform to the body it is worn by. If this is undesirable then either use steel or use a combination or steel and plastic.
Boning for corsets is a whole subject in itself so I am going to leave it off here with the understanding that this is just an introduction.
Leave a comment
All comments are moderated before being published.
This site is protected by hCaptcha and the hCaptcha Privacy Policy and Terms of Service apply.