

The Building of an Elizabethan Wired Ruff


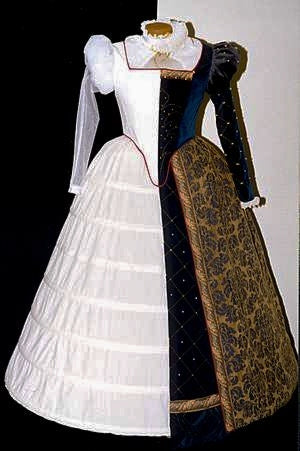
Garment with wire ruff
The wired ruff is not built in accordance with any body measurement; rather it is built according to the neckline shape of the bodice. This means the Elizabethan wired ruff is not interchangeable with other dresses than that for which it was made. Unless of course the other dresses were made from the same pattern and in the same size. Johanna Billings of the Stratford Shakespearean Festival Theatre built our Elizabethan wired ruff to fit the Simplicity Elizabethan Dress we made a few years ago. I have written the instructions based on her work.
A wire and paper mock-up or prototype should always be built first in order to experiment with shape, size and angles. Once the Elizabethan wire ruff is built it can be bent to adjust the shape marginally but it is best to build the shape in. Consideration must be given to the height of the sleeve puffs and to the hairstyle as both of these can effect the way the collar rests. You should count on at least 24 hours to complete this project; this time includes both the mock-up and the finished ruff, but not decorating. If you are not familiar working with wire then add a few more hours. This project takes time and patience, as you are creating the pattern as you go.

Note: We have used white rayon wrapped millinery wire and black organza to build our ruff. We did this to more clearly illustrate the details. White wire and white fabric would be the traditional choice and the ruff would be trimmed with lace. We opted not to trim or decorate the ruff in hope more attention would be paid to the structural details.


Begin by measuring the length of the neckline where the ruff will rest – note where ours begins. Add about 6" (15.5 cm) to this measurement to get the length of your first piece of wire. Using the gauge wire #19 (our product number 62-9019-01) cut a piece to the right length and mark the center point of the wire with a marker, this will be the center back. Begin to shape the wire along the neckline allowing 3" (7.75 cm) to extend below the neckline at each front point as seen in the photo above left. These extensions will aid in attaching the ruff to the garment. Once the wire is shaped you should be able to lift it off without it losing its shape. See photo above right.
Consider how high you want your ruff to be, ours is 10" (26 cm) at the deepest point which is center back. Cut 5-7 pieces of wire that are this length plus 2" (5.5cm) long. In our case 5 pieces that are 12” (31cm) long. They can always be cut down later. Bend one end of each wire 2" (5.5 cm) from the end to form a 90 degree angle. See photo below. Starting at the center back, tape the bent wires to the main frame using masking tape as indicated by the photo. This allows the short wires to flip up and down as if hinged. Keep these wires evenly spaced apart.

Cut another piece of wire at least 50" (128 cm) long, this will be the first support wire. Take one end in each hand and working with the curve of the wire place it underneath the short hinged wires. By working with the curve of the wire I mean to utilize the curve that exists from the wire being coiled, this curve can fall naturally around the back of the wire ruff. Keeping a cut end in each hand slowly raise and tilt the wire, lifting the hinged wires into place where you want them. Experiment with this. Keep in mind that this wire should be closer to the neckline than to the outer edge, a second wire will go near the outer edge.


If the support wire is too long cut it, but be sure it does extend down as long as the original wire at the two front ends. These will eventually get taped together.


Tape all the wire intersections in place using masking tape. Check that all wires are still evenly spaced and the support wire is still holding the wires where you wanted them. See the photo above left. The second support wire will need to be longer than the first, it is best to measure the approximate length; it can be cut shorter if needed. Experiment with this wire as you did with the previous one. Tape it into place being sure the spacing of the hinged wires are even, you can measure for this as well as standing back and visually checking for symmetry. Tape the three wires on each front together to create the two front extensions. See above photo on the right. This collar should remain stable when lifted off and should not lose its shape.


Back View Profile
Lift off the ruff and work at a table for the next step; applying paper. Any paper can be used; we used lightweight craft paper. Cut the paper into strips 1” (2.5cm) wide and at least as long as the collar is high at its deepest point, in this case 12” (31cm). Tape the strips over the wire ruff at right angles to the neckline (fan like) piece by piece. The paper will be on the front of the ruff and the tape will be on the back, the strips are necessary because there are many subtle and not so subtle angles and curves to be accommodated. This may seem like a mundane process but it is important. Be careful not to inadvertently bend the frame while attaching the paper. Replace the ruff on the garment and check the shape, bend it if needed back into shape or adjust the shape if you think it needs to be adjusted. You can now design your outline or outer edge, keep in mind the ends need to be supported by wires and these wires have to be incorporated into your pattern. For your first ruff keep it simple. Remove the ruff before drawing on the outer edge pattern and wire lines. This is a very visual aspect of the ruff building. Ours was done freehand but you may want to use a formula or tool of some sort. The support wires can still be changed at this stage if necessary. Note that the fewer joins the stronger the structure.


The photo above shows the wire ruff with the pattern for the outer edge and the decorative wire supports drawn on. The excess paper has been partially cut away. Note the front wire extensions are now tucked into the front of the bodice. A small piece of bone casing was stitched to the inside of the bodice to hold the wire in place, anchoring the front of the ruff.
Cut away all the paper around the outer edge to complete the image of the finished ruff. Transfer the wire markings to the underside as shown in the photo at right. Your mock up is now complete. Notice the three wires at the top right corner of the picture. These are the original neckline wire, the first support wire and the second support wire and they get taped together to create the extension that slides inside the front of the neckline to attach the ruff to the dress.


To build the real ruff you may wish to use heavier wire for a more sturdy ruff…..ruffs by nature are not durable garments and cannot withstand much abuse. Consider this when you are designing the shape and size. For theatrical use you may wish to use piano wire instead of millinery wire but this type of wire is much more difficult to work with. Remember the higher the gauge of the wire the finer it is in diameter and the more easily it will bend. Millinery wire in gauge #19 was used here, but gauge #16 is slightly heavier and would work well for the support wires.
Begin by recreating the neckline shape and the outer support wire by placing two new wires over the mock-up (which should be upside down on the table); be sure to include the extensions you will need at the front to insert in the bodice. See photo below.


Take a third wire and replicate the middle support wire, these three support wires can be in either #16 or #19 gauge wire, #16 being the strongest. All three wires should be long enough to be part of the front extensions; their ends will be bound together with thread later. You can tape these together for now
Once the three support wires are shaped and in place you can remove them as a unit, put it aside for later and begin the decorative support wires. From this point on I will refer to these wires as the “looped wires”. You may wish to use lighter gauge wire for these as it will be easier to shape and they create a more delicate look. We used our finest wire in #21 gauge. Use as few pieces as possible, the points that meet at the neckline are not cut ends but tightly bent angles (see photo below). To create the loops in our ruff we used two 3meter long pieces. The wire is taped to the mock-up in place over the drawn lines, (with the mock-up right side up on the table) tape it wherever needed to keep all wires in place.


When all the looped wires are complete and taped into place on the mock-up, pick up your support wire frame that was put aside earlier. Place it over top of the mock-up upon which the loop wires are taped. You will now tape the support wire structure to the loop wires at each intersection. Once this is done you can remove the tape attaching the loop wires to the mock-up and remove the ruff from the mock-up. The ruff will look like the photo below


The next step is to bind the wires to each other at the taped connections. This is done with thread in the same colour as the wire. We have used contrasting thread on the samples below to clearly illustrate the details. The thread used should be polyester as it is strong yet not bulky. There are two types of connections, overlapped and crisscrossed.
The overlapped connection is used when you need to continue a straight line and the crisscrossed connection is used when you have two wires crossing at an angle. To connect wires using the “overlap method” the wires need to overlap each other by at least 1" (2.5 cm). Hold them in place and wrap them with thread, be sure the thread ends have been tied off, see photo below. You will bind the two front extensions this way as well in order to make the three wires into one unit. When two wires cross you need to bind the connection by creating an “X” over the intersection, see the illustration below right.


Overlap join method Crissross join method
When all the connections have been bound cover each type of join with a good layer of glue (this includes the two front ends), we have used “Jewel Glue” by Delta as it dries clear and is made for jewels, beads etc. so should hold the steel. (Balsa model cement works well if “Jewel Glue” is not available.) Let the glue dry completely. Place the ruff back on the garment and check the shape. Make any adjustments now before the ruff gets covered with fabric.


The fabric you choose should be stable and not inclined to stretch but it needs to have some give on the bias. Organza is a good choice and gives the sheer look desired in a traditional ruff.
Lay the ruff on your fabric so that the straight grain is parallel with the center- line of your ruff, this will place the curved neck edge on the bias and will limit the amount of wrinkles you will get at the neck in this area. If wrinkles do occur in this area do not fight them, work them into neat tucks.
Begin to pin the organza into place lightly around the perimeter, then trim the organza and pin it more accurately around the neck edge. You may have an inch deep seam allowance or more; it will eventually be trimmed away.


Pin all edges into place with a minimum of 1" (2.5cm) seam allowance. Hand stitch closely along the wire edges on the inside of the wire, keeping the fabric taut. Thread should match the fabric and stitches should be small and neat to keep them as invisible as possible.


Once all the stitching is complete trim the seam allowance to about 1/8" (3mm), be very careful not to cut the fabric! Apply a generous but tidy amount of glue over all seams; take particular care at corners. Let the glue dry completely.


All that is left now is adding two tabs to the back and decorating.
The tabs for the back are used to secure the back of the ruff to the garment. Take two pieces of twill tape, 2 ½" (6.5mm) in length and fold each in half to form a loop. Hand stitch the male side of a snap onto each loop.

Hand stitch each loop onto the bottom edge of the ruff at equal distances from center back. The tab will be slipped down inside the garment so the snap needs to face the inside of the back of the garment. Stitching the raw edges to the ruff.

Place the ruff on the garment and mark the placement for the female side of the snap on the garment. Stitch the female side of the snap on the inside of the garment where marked. By sewing the male snap to the tabs, the dress can be worn comfortably without the ruff as no snap point will be pressing into the body.
Your ruff is now ready to wear or decorate.


Front Side Back
Leave a comment
All comments are moderated before being published.
This site is protected by hCaptcha and the hCaptcha Privacy Policy and Terms of Service apply.