

As soon as I saw this costume pattern I had to have it, even though I knew that I would not be comfortable wearing it now...at 56, but I wanted to make it! Luckily I have a friend who was totally thrilled with the idea of wearing it, so I've made it for her.
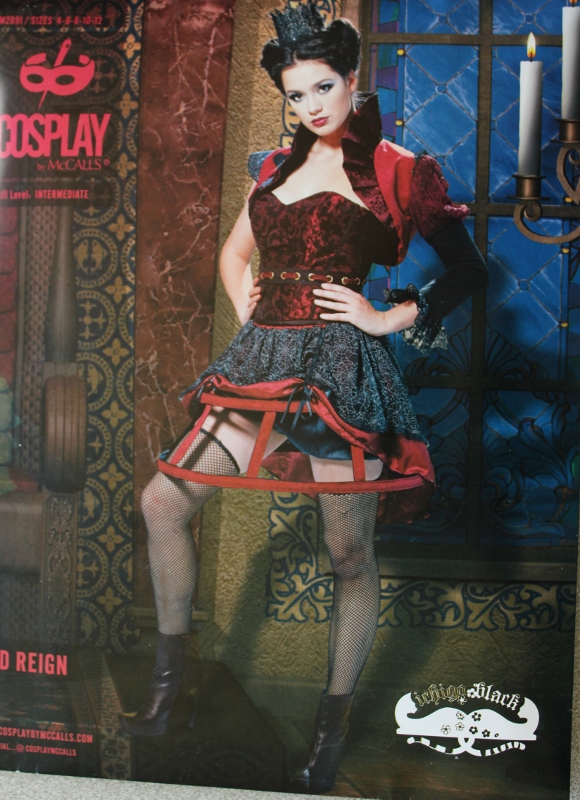
This pattern is one of the McCall's Cosplay Patterns and it had to be ordered on-line, it was not available at my local fabric "chain store". You can get it at www.cosplaybymccalls.com
This blog post is about my experience making this costume and one thing you should know before I start is that I never make a pattern as it is outlined in the instructions...never. That does not mean I think everyone should deviate from the instructions, but with forty years of sewing behind me I tend to have my own way of doing things, so I read the instructions - but usually do my own thing and that includes making design tweaks.

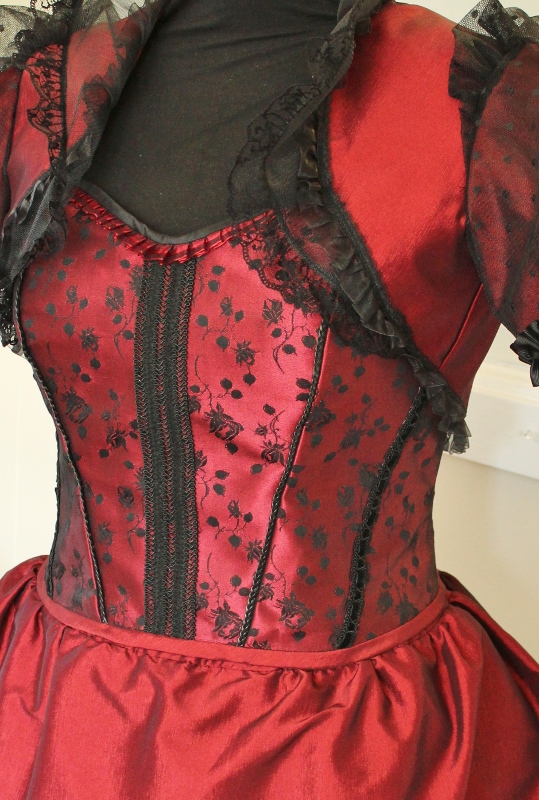
I started with choosing my fabrics and did stay with the colour theme of red and black. I chose brocade coutil from Farthingales, the black with red roses brocade coutil, but I opted to use the "wrong side" of the fabric! The lining of the corset is black corset fabric, also from Farthingales. The fabric for the skirt, hoop casings and jacket was from www.VogueFabricsStore.com and was a red and black shot, light weight taffeta that matched the wrong side of the coutil almost perfectly. I also used this fabric to bind the bottom edge of the corset so that it would match the skirt. It looks like it could be the same fabric used my McCalls for the underskirt and hoop casing.
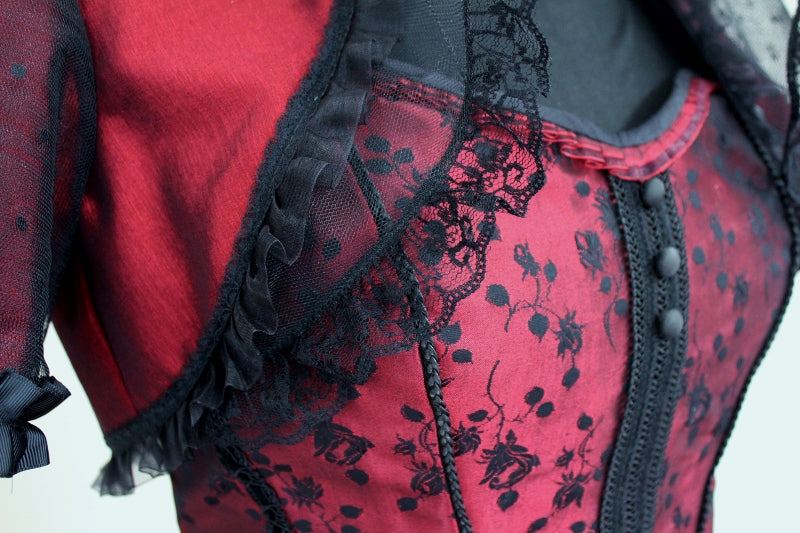
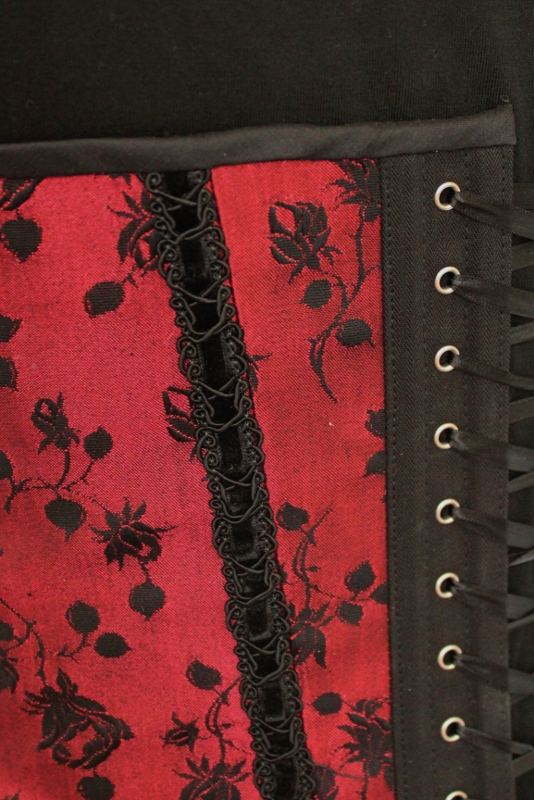
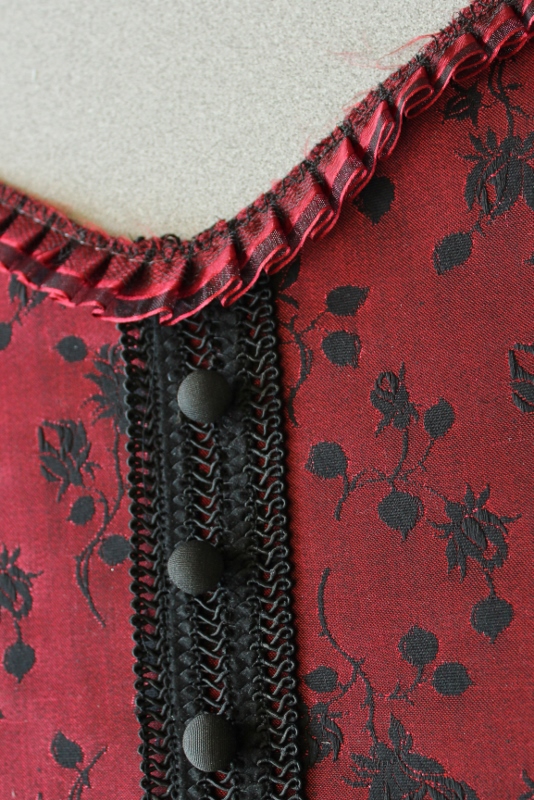
I decided to use lacing tape rather than set grommets as it's so much faster and it gave me a chance to showcase the lacing tape from Farthingales. You can see the black lacing tape in the image below and how well it works with the "wrong side out" coutil. Lacing tape is made of fine herringbone coutil and matches the same coutil at Farthingales, it's designed to allow bones on either side of the eyelets which are preset by machine. It gets sewn onto the corset, so while it may seem a bit expensive it can save not only time but the risk of errors when setting grommets by hand. The decorative trim has been sewn over the back seam and the top edge has been bound with black silk shantung, both from my stash. This is not how the pattern says to finish the top edge and I'll explain why I did it differently, next.

The pattern instructions say to make the lining separately, which I did even though it's not my favorite way of corset building. Then you are to place the lining and outer layer wrong sides together and sew along the top edge - but I wanted a ruffle along part of the top edge and I wanted it to lay flat. If I had sewn the lining to the outer layer as instructed it would have made the ruffle stand up toward the chin, so instead I bound the top edge. This means the ruffle still lays flat but it also means the corset is 5/8" higher along the top edge since I've bound the seam allowance rather than turning down between the outer layer and lining. A bit of extra length here is not a problem, I could have trimmed it down, but didn't.

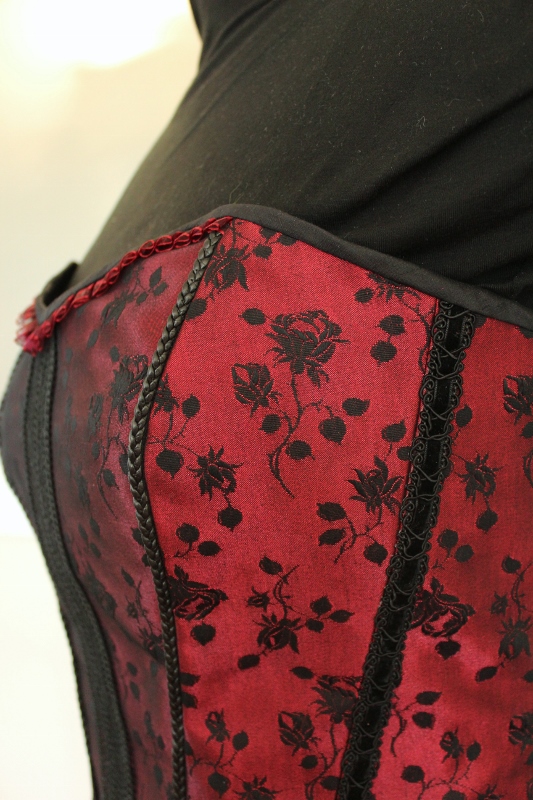
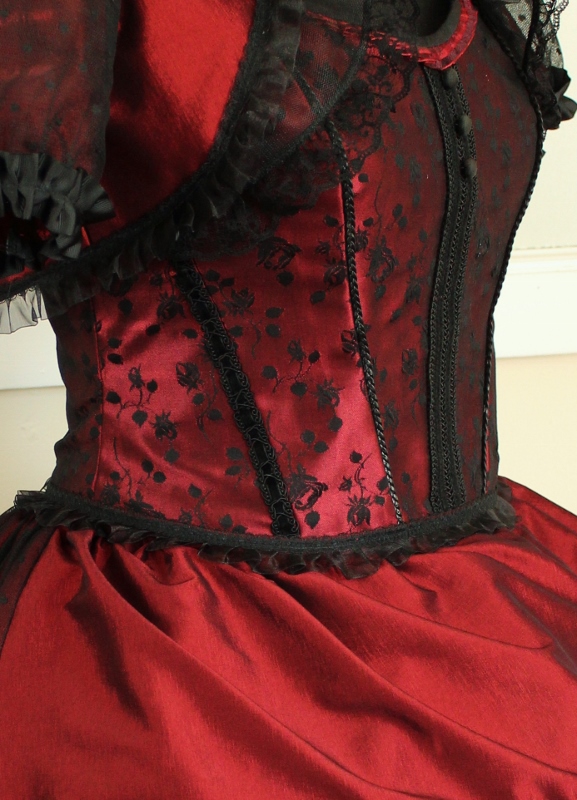
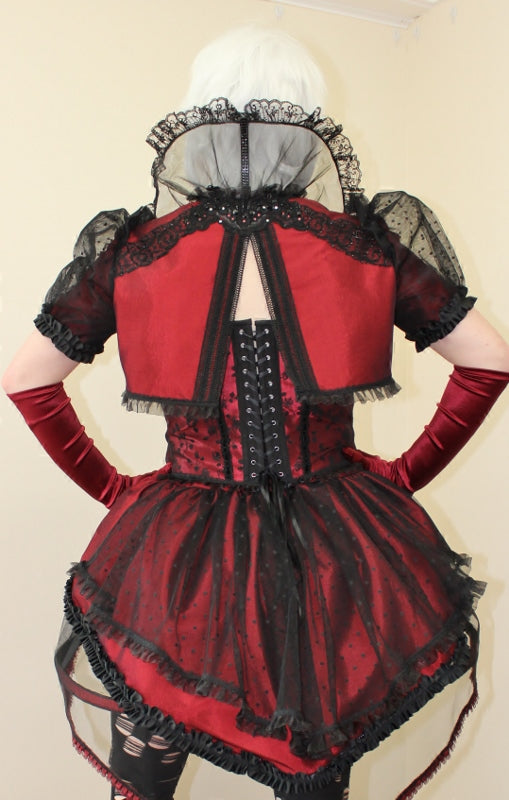
All the trims I used were from my stash, the ruffle above (that matches so well) was left over from corsets made when we were in Los Angeles a ten years ago! I also used it on the skirt and there is now only about 3" left, which I am willing to throw out. The center front braid on the corset above is also from our Los Angeles days and I've used it both on the corset front and on the bolero back. Below is a side view of the almost finished corset, the princess seam has been "piped" with faux leather braid piping that I've had for a few years and used in other costumes, there was just enough left to do these two seams. The velvet ribbon through braid is sewn over the side front seam. All trims were sewn on before the lining was added and the bone casings are all in the lining layer of "corset fabric" (not coutil) from Farthingales. The corset bones are a mix of spiral bones and spring steel bones and all are held in place using black bone casing tape that's been sewn to the lining, so you don't see any stitching on the outside!

I bound the top edge with black silk shantung because I actually had several bias strips in my stash, I bound the bottom with bias strips of the skirt fabric so that the bottom edge of the corset would blend seamlessly with the skirt. Ultimately I decided to add some black organza ruffle to the bottom edge, simply because I had some left after using it on the bolero and the skirt. Why not use it all up, besides it ties them all together.


So, I've added more trim than the pattern called for and did not include the belt, though I may still add one that is not attached. I've got some wide antique nickel chain that I might add when I see the whole costume on Grace. I made the corset in a more traditional way by not sewing the lining and the outer layer together but binding both the top and bottom edges after I had sewn lacing tape on the to backs. NOTE: if you use lacing tape you need to trim the back edges down, otherwise you'll get a corset that is bigger than you want it to be since you're adding the width of the lacing tape to both back edges.
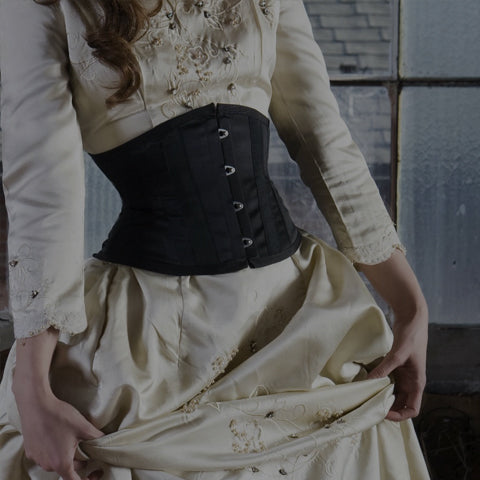
The corset has been laced with double faced 6mm wide satin ribbon and three covered buttons were added to decorate the front which has no busk. I cut the size 14 based on Grace's measurements and it fit well with no back gap when I made the mock up.
Making of the Bolero is in another Blog Post
This pattern is one of the McCall's Cosplay Patterns and it had to be ordered on-line, it was not available at my local fabric "chain store". You can get it at www.cosplaybymccalls.com
This blog post is about my experience making this costume and one thing you should know before I start is that I never make a pattern as it is outlined in the instructions...never. That does not mean I think everyone should deviate from the instructions, but with forty years of sewing behind me I tend to have my own way of doing things, so I read the instructions - but usually do my own thing and that includes making design tweaks.
I started with choosing my fabrics and did stay with the colour theme of red and black. I chose brocade coutil from Farthingales, the black with red roses brocade coutil, but I opted to use the "wrong side" of the fabric! The lining of the corset is black corset fabric, also from Farthingales. The fabric for the skirt, hoop casings and jacket was from www.VogueFabricsStore.com and was a red and black shot, light weight taffeta that matched the wrong side of the coutil almost perfectly. I also used this fabric to bind the bottom edge of the corset so that it would match the skirt. It looks like it could be the same fabric used my McCalls for the underskirt and hoop casing.
I decided to use lacing tape rather than set grommets as it's so much faster and it gave me a chance to showcase the lacing tape from Farthingales. You can see the black lacing tape in the image below and how well it works with the "wrong side out" coutil. Lacing tape is made of fine herringbone coutil and matches the same coutil at Farthingales, it's designed to allow bones on either side of the eyelets which are preset by machine. It gets sewn onto the corset, so while it may seem a bit expensive it can save not only time but the risk of errors when setting grommets by hand. The decorative trim has been sewn over the back seam and the top edge has been bound with black silk shantung, both from my stash. This is not how the pattern says to finish the top edge and I'll explain why I did it differently, next.
The pattern instructions say to make the lining separately, which I did even though it's not my favorite way of corset building. Then you are to place the lining and outer layer wrong sides together and sew along the top edge - but I wanted a ruffle along part of the top edge and I wanted it to lay flat. If I had sewn the lining to the outer layer as instructed it would have made the ruffle stand up toward the chin, so instead I bound the top edge. This means the ruffle still lays flat but it also means the corset is 5/8" higher along the top edge since I've bound the seam allowance rather than turning down between the outer layer and lining. A bit of extra length here is not a problem, I could have trimmed it down, but didn't.
All the trims I used were from my stash, the ruffle above (that matches so well) was left over from corsets made when we were in Los Angeles a ten years ago! I also used it on the skirt and there is now only about 3" left, which I am willing to throw out. The center front braid on the corset above is also from our Los Angeles days and I've used it both on the corset front and on the bolero back. Below is a side view of the almost finished corset, the princess seam has been "piped" with faux leather braid piping that I've had for a few years and used in other costumes, there was just enough left to do these two seams. The velvet ribbon through braid is sewn over the side front seam. All trims were sewn on before the lining was added and the bone casings are all in the lining layer of "corset fabric" (not coutil) from Farthingales. The corset bones are a mix of spiral bones and spring steel bones and all are held in place using black bone casing tape that's been sewn to the lining, so you don't see any stitching on the outside!
I bound the top edge with black silk shantung because I actually had several bias strips in my stash, I bound the bottom with bias strips of the skirt fabric so that the bottom edge of the corset would blend seamlessly with the skirt. Ultimately I decided to add some black organza ruffle to the bottom edge, simply because I had some left after using it on the bolero and the skirt. Why not use it all up, besides it ties them all together.
So, I've added more trim than the pattern called for and did not include the belt, though I may still add one that is not attached. I've got some wide antique nickel chain that I might add when I see the whole costume on Grace. I made the corset in a more traditional way by not sewing the lining and the outer layer together but binding both the top and bottom edges after I had sewn lacing tape on the to backs. NOTE: if you use lacing tape you need to trim the back edges down, otherwise you'll get a corset that is bigger than you want it to be since you're adding the width of the lacing tape to both back edges.
The corset has been laced with double faced 6mm wide satin ribbon and three covered buttons were added to decorate the front which has no busk. I cut the size 14 based on Grace's measurements and it fit well with no back gap when I made the mock up.
Making of the Bolero is in another Blog Post
Leave a comment
All comments are moderated before being published.
This site is protected by hCaptcha and the hCaptcha Privacy Policy and Terms of Service apply.